I found it interesting, that after posting my
Christmas blog in December, I received several e-mail comments -- not about the writing, but rather about the photo of our Christmas tree. Not exactly the response I was expecting, but flattering (I guess) none-the-less...
Most of the comments read something to the effect of: "I really like the [Christmas tree] picture. How did you get the starbursts?" Well in the "old days" I would have used a
cross screen filter on my trusty SLR's 35-70mm zoom lens, as I was taking the picture. These filters are easily available for digital SLR lenses, but I didn't happen to have a filter when I took this digital photo (and to be honest it was taken in the wee hours of Christmas morning, and I was too tired/exhausted to even think of putting a filter on at the time anyway). So I manipulated the picture in Photoshop to get the effect (which has to be one of the chief advantages of digital photography over the "old days").
The Photoshop technique I used isn't as straight forward as applying a ready-coded starburst filter (mostly because I just don't like the results from the filters I have seen). But this process has a finite number of steps, so that most casual Photoshop users can create the effect with a little bit of effort and, if I dare say so myself, produce some very nice images. So here is a tutorial detailing this technique for those who expressed some interest.
DISCLAIMER: This tutorial assumes that you have some previous experience with Photoshop and understand simple concepts like selecting tools/procedures from the menus, using the magic wand, pencil and lasso tools, cutting and pasting, etc... Also, please note that clicking on the images will bring up larger, more detailed, versions.
 |
| image 1: original photo w/background isolated |
To begin with, the original picture I started with needed some work. As you can see, there is a hideous shadow (the result of using the camera's flash in an unlit room), also the background is cluttered and detracts from the main focus, which is the tree. So, my first step was to isolate the background. This ends up being the most tedious step in the process (using a combination of Photoshop's magic wand and lasso tools).
After isolating the background, choose Select -> Inverse from the menu bar and then the copy/paste commands to create a layer that includes only the tree and presents (the foreground) then change the exposure on the background layer via the Image -> Adjustments -> Exposure menu until you get the desired effect.
 |
| image 2: after adjusting the background exposure. |
As you can see in
image 2, the result is a much improved photo which still retains some hint of the depth behind the tree (that depth would disappear if the foreground was simply placed on a black background).
Now that the photo is prepared, select Layer -> Merge Down from the menu bar (or type ⌘E) to create the new background layer. Then duplicate the background layer by selecting the Layer -> Duplicate Layer option from the menu. Be sure to choose the "new" Layer 1, from the layers tray, then choose the Threshold option from the Image menu (Image -> Adjustments -> Threshold). The Threshold option converts your layer to black and white (not grey-scale, but actually black and white pixels). This will result in your workspace looking like this:
 |
| image 3: applying Threshold command to Layer 1. |
As you can see, the lightest areas on the original image are now white and the remainder is black. The goal, for a good starburst filter is to isolate the areas of white, so that they correspond to where you want the effect to show up in your photo. I adjust the Threshold level in the dialog box to remove most of the black/white balance until the lights were the primary points of white:
 |
| image 4: adjust the Threshold Level to isolate areas where the star effect will be added to the photo. |
After this step is complete, you will notice that there are still many white spots that do not correspond to the light spots where you wnt to apply the effect. Switch to the Pencil on the Photoshop tool pallet (I used a 13px sized pencil) and blacken in any of these white spots. To make your life slightly easier, you can zoom in and toggle the black and white layer on and off, to determine which areas to blacken out as follows:
 | |  |
| image 5 | | image 6 |
After you have cleaned up all of the white spots on layer 1, to your satisfaction, duplicate the layer again, by selecting Layers -> Duplicate Layer from the menu. Your layers tray should now look something like this:
 |
| image 7 |
Most of the set-up work is now complete, so you can get into the meat of creating the star filter effect. To begin, select the copy of your first layer (the one that you just created) in the Layers tray.
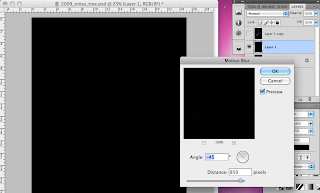
On this layer, you will want to apply one of Photohop's pre-set filters called the motion blur. Select the motion blur from the filters menu (Filters -> Blur -> Motion Blur). If you have ever used motion blur before, the filter will have the last settings that you used pre-populated in its dialog box. In all likelihood, these will need to be modified.
First, change the angle of the blur. In this example I used a simple cross hatch where the rays of light emanate out perpendicular to each other (i.e, at 90
° angles respectively). You can choose to make your stars have more than two axes or non-perpendicular ones as well.
In this example, I chose to start by setting the blur axis to 45°. After establishing the angle of the first axis, then you can adjust its length by changing the value in the distance box (I chose 850px).
 |
| image 8: adding the first motion blur |
Now, as you can see from the accompanying scree shot, the layer appears to be solid black. This means that the blur filter has done its job, blendeding the white spots into the black background. However, do not fret, your streaks of white are there we just need to use the levels command to bring them back out.
Select Image -> Adjustments -> Levels to open the Levels dialog box which will look like this:
 |
| image 9: open the Levels dialog box. |
Click on the white slider in the input levels chart and slide it to the left, as you do so, you will see the streaks of white lighten up as you move your mouse to the left:
 |
| image 10: bringing out the blurred streaks of light. |
Now that you have "illuminated" the streaks, take a moment and jot down the values below the Input Levels graph. You will want to use these values when you go to create the perpendicular (cross-hatched) layer. You will also notice that these streaks are fairly uniform in size and that they end rather abruptly (based on what you chose for the length in the blur step). The starburts formed on a real cross hatch filter taper off at the ends. To accomplish this, simply re-apply the motion blur filter. Since this was the last filter you used, it will be at the top of the Filter drop-down menu so select Filters -> Motion Blur (or type ⌘F):
 |
| image 11: 2nd motion blur pass. |
The result of the second blur pass should give you a series of nice long, tapered, streaks:
 |
| image 12: first light streak layer complete. |
Now you are going to switch from this layer back to layer 1 (the layer originally manipulated with the Threshhold level adjustment. On this layer, you will repeat the steps above, to create another layer of streaks. However, the blur on this layer should be perpendicular to the blur created initially. Since I used a simple 45° blur on the initial layer, I'm just going to reverse that by changing the angle to -45° (the distance will remain the same):
 |
| image 13: creating a new layer with a perpendicular blur. |
Once again, select Image -> Adjustments -> Levels from the menu, and this time type in the values you wrote down from the initial streak layer, then re-apply the secondary motion blur:
 |
| image 14: adjust the levels using the same values as the first time. |
Now you'll need to blend the two "streak" layers together to create the cross-hatch effect. I do this by using the screen option from the pull-down menu on the layers tray:
 |
| image 15: blend layers using the screen option. |
The screen option works particularly well because the background on the image layers is black. The result of blending the two layers shows the classic cross-hatching that we are looking for:
 |
| image 16: after blending the "streak" layers. |
Be sure you have the top most layer selected and select Layer -> Merge Down (⌘E) again, combing the two top layers:
 |
| image 17: merge the two streak layers to create the cross-hatch. |
The last steps are to take the cross-hatch layer and blend it into the background image, then make any adjustments to the cross-hatch layer to "punch up" or "tone down" the starbursts, and finally to flatten the final image for the web...
Blending the starburst streaks into the background can be done using several different
blend mode techniques. As was done to create the cross-hatch layer itself, you can use the screen option to blend the layers together. This may work for some kinds of images, but on images with rich colors the result of the screen blend maybe "too white" (it is for my tastes). So for this example, I chose the
color dodge blending option:
 |
| image 18: Blend the cross-hatch using the color dodge mode. |
After applying the blending mode, use the Image -> Adjustments -> Levels menu to change the input levels on the cross-hatch layer to achieve your desired starburst effect:
 |
| image 19: adjust the levels on the cross-hatch layer before merging the layers and saving the image. |
Merge the top layer down again (⌘E), and save the image in your favorite file format (JPEG or PNG for web) for the finished star filtered image.
QED


